

This article goes through the implementing details of Speech to Text over on VoicePing & how the developers managed to squeeze out the highest amount of efficiency from the cloud service.
VoicePing comes feature-packed & is an ideal solution for remote teams! We are offering an entire year’s worth of premium subscription FOR FREE, head over to https://voice-ping.com/ to get started!
Abstract
Implementing Speech-to-Text from scratch and achieve good recognition results/accuracy is very hard. That’s why many companies and developers prefer to choose an existing provider that already offers a SaaS solution, with excellent results and available for a wide variety of languages.
Depending on the usage, it may be a cheap solution, as the charge method they use is “pay as you go”, but this is also a reason why it may be expensive, if you use it too much. It will depend on how you use it, and how much.
On this article, you’ll see the strategy we use on VoicePing to cut off the high costs related for applying STT on our users audio from a meeting. This is possible due to the fact that in a meeting, most users are just listeners and don’t speak for the most part of the meeting. The strategy is based on using Voice Activity Detection (VAD) libraries to avoid this silent audio from streaming to the service.
We’ll also show how did we resolve all the issues that we faced when trying to implement such a strategy.
Introduction
Speech-to-Text (STT), also known as Automatic Speech Recognition (ASR), is a feature that has many use cases, for example, automatic subtitles generation, like it’s done on YouTube; personal virtual assistants, like Siri, Alexa, and Cortana; and there are many other kinds of voice-enabled applications that do a great use of this awesome feature.
On VoicePing, it is used to show real-time transcriptions during the meetings while we speak, making it possible to show real-time translations over these transcriptions. You can also set it to automatically synchronize these transcriptions to a public or private channel on your Slack workspace, to keep a safe log of all communications that happen on work-related discussions in your company.
Once these transcriptions are synced to Slack, you can use all the great features Slack offers, like bookmark the messages related to tasks assigned to you during the meeting, pin some messages on the channel to make sure the team won’t forget about specific items discussed on the meeting, or even continue the discussion on a Slack thread in case the meeting had to finish early and the available time wasn’t enough to discuss everything.
Implementation
Implementing an AI system capable of converting audio into text is not an easy task, it’s not a subject for a simple article like this, and definitely not a job for a single person, it would require tons of audio files with transcriptions to train and validate AI models, and more different languages to support, more work to do. Even if I wanted to dig into this subject, right now I have no idea where to start.
For my luck, there are plenty of services available out there, and the quality of these services are better each day, in some cases its accuracy is comparable to professional human transcribers, but depending on the number of users your app has and your revenue, this could be too expensive and unsustainable. I can suggest two different solutions to work around the cost issue:
The first solution is the cheapest option, using a free service. Most services have a free tier offering a limited amount of usage, they limit on concurrent usage and on the number of minutes you can spend. If the free tier is not enough for your app, I don’t know any SaaS solution that doesn’t charge, but… there is an experimental Web Speech API. Some browsers already implement it, like Google Chrome and Microsoft Edge.
They are great, but it still has limitations, the most obvious, as it’s an experimental API, not all browsers implement it, so it may look bad for your app’s reputation if you ask your users to use another browser. Another limitation is the API itself, right now there is no way to select which input device it should use, you just call .start() and it always start recording the audio from the default input device.
This led us to choose a third-party service, pay for it, and find our way to reduce the costs, this is the second solution I’ll talk about in the next session…
Reducing the costs
When you use a service like this, it’s fair that you pay based on the amount of workload you generate on their servers, on Speech to Text solutions, we pay something around 1.00 and 1.50 USD/hour. It may get around 0.50 USD/hour for an extremely high volume of usage, like over 80,000 hours a month. And the worst part is that when you send an audio stream or an audio file to be processed, it doesn’t matter if the audio has some speech on it or not, they see it just as a bunch of bytes they will have to process, they have inbound bandwidth costs associated with it, and even though the processing cost of silence audio may be less if they take some shortcuts, they are still processing it, so they will charge you.
On VoicePing, if we have a meeting with 5 participants and 1 hour of duration, we would need to pay 5 USD just for this single meeting. If this same team have 6 of these meetings a month, it would be 30 USD. If the team have 10 participants instead of 5, then 60 USD, for just this single team. So just 10 teams like this using our app, it would be 600 USD a month. This would not be a problem if you are paying for something that is worth it if you are making good use of it, but for a 10 participants meeting, it is not the case, they won’t be all speaking at the same time, for the most part, there will be just a single person speaking. In some cases none, if you ever participated in a Scrum retrospective meeting you know, sometimes nobody speaks, we set a count-down timer on the screen, and everybody has some minutes to write down the good and bad parts about the last sprint. This is a big waste of STT minutes.
To work around this waste, the most obvious solution is turning STT off whenever the microphone is muted. We do this, and it reduces a lot the usage, but it’s not enough, because it depends on the users to turn their mic off when they are not speaking. Whoever participated in many meetings knows that it doesn’t happen, we always have non-speaking users with the mic on. I’m not saying they are wrong on keeping it on while not speaking, I agree that it’s annoying to turn the mic on and off every time we want to speak, and there is no harm in keeping it on as long as it doesn’t make noise.
Even though we have a warning telling you that your mic is off in case you start speaking and forget to turn it on, we believe you should be able to keep the mic on during the entire meeting, the mute feature is meant to be used just in case you do want to speak but not on the meeting, like when we need to answer a phone call or talk to someone on our office. On VoicePing you can keep it on during the entire meeting without disturbing other participants, thanks to the awesome Noise Reduction feature that is enabled by default, but this is a theme for another article, you can check more about VoicePing Noise Reduction here https://tagdiwalaviral.medium.com/struggles-of-noise-reduction-in-rtc-part-1-cfdaaba8cde7.
The fact is, many users do keep their microphone on, and we need to avoid the waste of Speech-to-Text minutes spent on their silent audio, so before we send the audio to be processed on the service, so they can do the hard work that is to convert the audio into text, we first pre-process it on the client/browser, using something called Voice Active Detection.
Let’s show the code, starting with the initial setup and the expected result.
Initial setup
We are using React and TypeScript, so I’ll show examples using React hooks. Also, we use Azure Speech to Text service, so the examples will use Azure API, but the strategy to reduce the usage is valid for any service.
We created a custom hook useSpeechToText which I’m going to show the code later, but first we have this example root component, that is the code that calls our custom hook useSpeechToText:
The above code has just two things:
- A button to mute/unmute the microphone
- A list of recognized speech, with:
- Partial/interim results are shown in red
- Final results are shown in black
We defined an array of results on the component’s state, and that showMessage function just inserts the last STT result on the array or replace the last element in the case of partial results. We can see how it works in the example video below. Please notice that:
- It just recognizes the text after we click to unmute
- As we can see on the Network tab in the Dev Tools, it just sends data when it is not muted
As we can see on the code above, it doesn’t have any logic for calling the STT service. This logic is all inside the useSpeechToText hook, that we can check in the code below:
There are a lot of details, but the most important part here is where we send the data to the service, that happens inside the onAudioProcess function, more specifically, on the pushStream.write(block.bytes); call (line 73). The most important changes to reduce the service usage will be around this line.
As we can check on the video above, when the microphone is not muted, it keeps sending data to the service continuously, to fix that we’ll integrate the VAD on this hook.
Voice Active Detection (VAD)
Converting speech into text is a hard work, it’s very complex for us to implement on our own, that’s what makes it worth the price we pay, but obviously, silence audio have no speech on it, and to identify if some audio have speech or not, is not that complex and this we can do. Well… we could, but in this case we don’t need to, other people have already done that, and their open source code is available for free, so we don’t need to reinvent the wheel, these are two npm packages that does that:
We decided to use the hark package, that is very easy to use, we created this reusable hook:
This code just takes as parameter the MediaStream object that we already have, instantiate hark on this stream, and binds on both hark events speaking and stopped_speaking some functions that will set a boolean state that indicates if the user is speaking or not. We’ll use this state to turn STT on or off. But it’s not that simple, there are some issues we need to take care of, and we’ll talk about them on the next examples.
Integrating VAD code into STT code
On the previous version of the useSpeechToText hook, we had this code below using this mutedRef react ref to check if we should send data to the service or not. We used this ref to check instead of checking directly on the muted parameter, because the function onAudioProcess is defined inside the same useEffect hook that instantiates the Azure’s SpeechRecognizer instance, so we used the ref to avoid recreating the Azure instance.
To integrate the VAD, we’ll use a new flag called streamingFlagRef that we’ll be based on the muted state (parameter muted), and the VAD state we defined on the useAudioActive hook (used here on the speakerActive variable). We also used the running.current to make sure it doesn’t stream before the Azure instance has been initialized.
We keep all these variables in an AND boolean expression in the shouldStream variable, whose changes will trigger the useEffect that updates the streamingFlagRef ref value.
Now we check for if (streamingFlagRef.current) instead of checking for if (!mutedRef.current) whenever we call pushStream.write(block.bytes); to send data to the service. These are the changes made on the code:
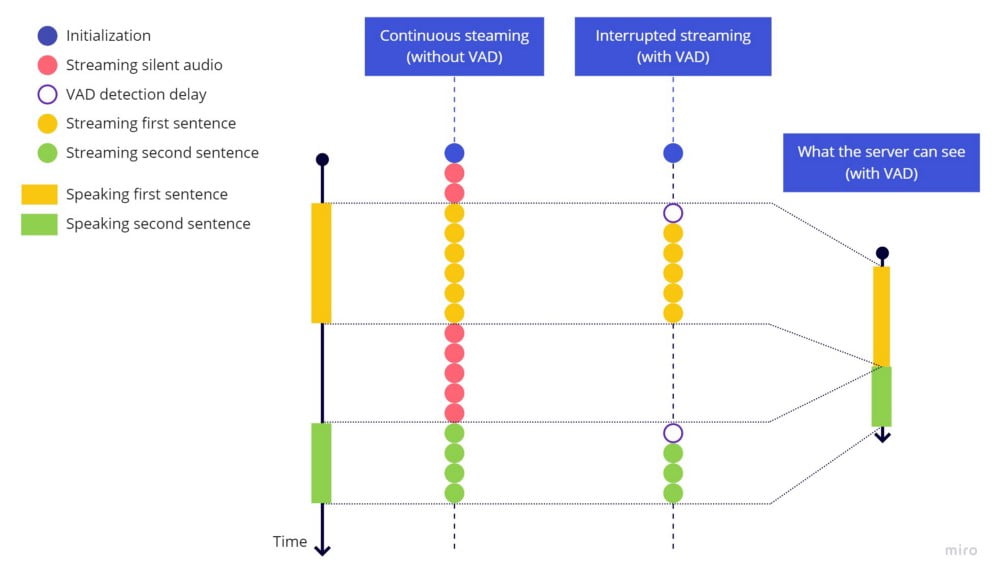
As we can check on the video below, it stops sending data when we stop speaking, but we have a new issue:
As we can see on the video above, when we stop speaking, it seems the streaming was interrupted too early, because:
- We are stuck with partial results (in red state)
- When we speak again after a pause, instead of starting a new sentence, it continues appending on the previous sentence as if there was no pause between them
This happens because the service needs a pause on the speech to identify the finish of the previous sentence and the beginning of the next one. If we don’t stream at least a small bit of the silent audio, the server will see the both sentences as a single continuous sentence without pauses, the way it’s shown on the line in the right side:
A simple fix for this issue would be a timeout before stop streaming, let’s try that including these highlighted lines:
If we test again, this is the result:
As we can see, the timeout before stopping the streaming worked, each sentence ends well, the next sentences are identified as new sentences after a pause with silence, but if we speak fast, we lose a piece in the beginning of the sentence. This happens due to a delay between the time we start speaking until the time the VAD library detects some sound to start sending the stream again.
This is what is happening, notice that we still have the empty VAD detection delay in the beginning of each sentence:
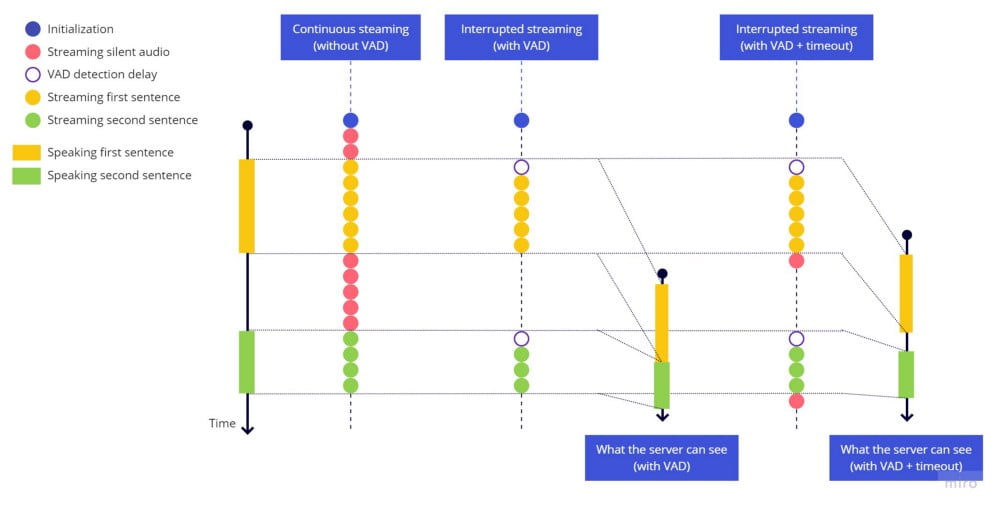
When we start sending the stream, the first part of the audio related to the beginning of the first word is already lost because of this delay, we didn’t send this part. This is similar to the issue we had at the end of the sentence, but here we can’t just add a timeout, because we would have to set a timeout to run in the past, it’s impossible.
And this issue is aggravated by the fact that the VAD library is very sensitive, any small pause can trigger the hark_stopped, leading to some kind of bouncing effect making the stream to start and stop multiple times during some sentence.
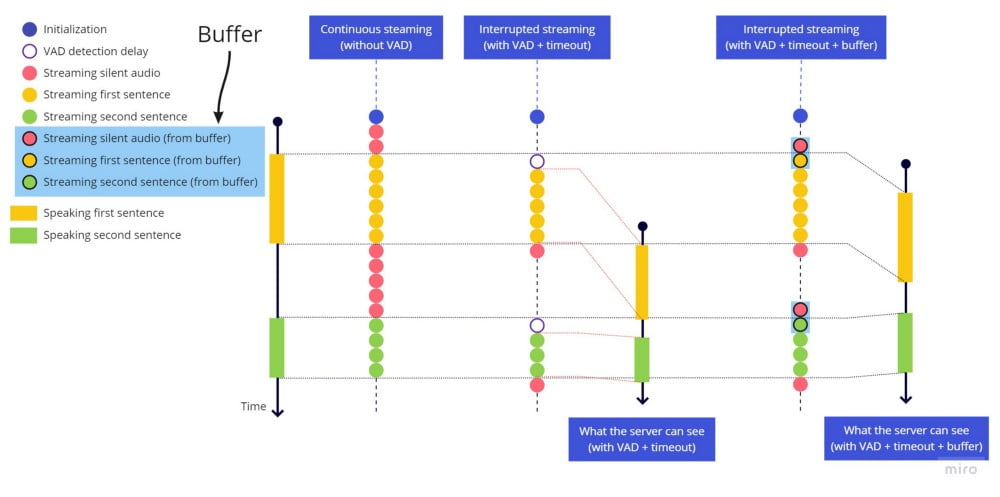
The final solution
As the two issues are related and it’s difficult to show the bouncing issue without the cut-off issue, we’ll handle both at the same time.
To fix the cut-off issue, as it doesn’t make sense to add a timeout in the beginning of the speech the same way we used in the ending of the speech, we need to add a buffer that will always have the last 2 seconds of audio. So when hark detects some voice activity, we first send the entire buffer, right before sending the live streaming. The delay we have isn’t that much, but we decided to use 2 seconds because in some languages, we can get better accuracy when the audio have some empty/silence before the beginning of the speech.
To fix the bouncing effect, whenever the stop_speaking hark event is triggered, we will start a 2 seconds timeout and will only stop sending the stream after these 2 seconds. But if during this time we detect some voice activity (speaking hark event), then we cancel the timeout and just keep sending the stream as if we had not detected the stop of the voice activity.
These are the changes:
- We added
BUFFER_SECONDSconstant at the top of the file to hold our buffer size in seconds - We added
bufferBlocksref at the top of the hook implementation, to hold the buffer array - We added the timeout handling the bouncing effect inside the
useEffecthook that controls the value of thestreamingFlagRefref - We check inside
onAudioProcessif we can stream audio to the service:
- If we can, we send the buffer first (in case it isn’t empty), and then send the current block related to the live streaming
- If we cannot, we just add the current block at the end of the buffer array, and in case we reached the max size, we remove the first element in the buffer, to keep buffer size the same as we defined in the
BUFFER_SECONDSconstant
5. We clean the buffer inside the last useEffect cleanup function, to make sure we start with a clean buffer in case we mute/unmute the microphone
Let’s see how it works:
Using the buffer to keep the last seconds available at any time to send before starting the live stream when we detect voice activity, it works like this:
Final thoughts
As we can see on the Network tab on Chrome dev tools, the only data sent to Azure service happens while we are speaking. All the issues we solved during this article are the same issues we faced during the development of VoicePing. This code is not exactly the same as we have on production today, one of the differences is that we replaced the createScriptProcessor (that is a deprecated API) for AudioWorkletNode that uses Web Workers to avoid audio processing inside the main event loop of the app. I chose to show the script processor version in this tutorial to keep it simpler.
Another architectural change I would recommend, would be to keep the handling for the bouncing effect inside the useAudioActive that encapsulates the use of hark, instead of keeping it mixed in the code that defines the streamingFlagRef flag value. On our code we didn’t do that because the useAudioActive is used on multiple places, and on these other places we do want to keep the bouncing effect as it is.
We invite you to try these features on VoicePing: https://voice-ping.com/
Source code
This is the final version with all the previous changes applied. Thanks for reading…